Sunday, July 31, 2016

York Error Code (Normal)

York Error Code

York Minisplits


Temperature Sensor Resistance Readings

Temperature = 0C
K Ohms = 35K

Temperature = 10C
K Ohms = 20K

Temperature = 20C
K Ohms = 13K

Temperature = 30C
K Ohms = 8K

Fault Codes for RAHC, YKHC & YUHC Models

Indoor lights

Operation = Flash
Timer = Flash
Defrost = Flash
Faults = Outdoor Problem

Operation =
Timer =
Defrost = Flash
Faults = ID Air Sensor Fail

Operation = Flash
Timer =
Defrost =
Faults = ID Pipe Sensor Fail

Operation =
Timer =
Defrost = Flash
Faults = OD Pipe Sensor Fail

Operation = Flash
Timer = Flash
Defrost =
Faults = PCB Fail

Outdoor LEDS 3ph models only

LED 1 = Flash
LED 2 = Off
LED 3 = Off
Faults = Phase Error

LED 1 = Flash
LED 2 = Flash
LED 3 = Off
Faults = Pressure Switch

LED 1 = Off
LED 2 = Off
LED 3 = Flash
Faults = Overcurrent

LED 1 = Off
LED 2 = Flash
LED 3 = Flash
Faults = OD Pipe Sensor

LED 1 = Off
LED 2 = Flash
LED 3 = Off
Faults = OD Air Sensor

LED 1 = Flash
LED 2 = Flash
LED 3 = Flash
Faults = Hi Temp Protection

Electrical Wiring Diagrams for Air Conditioning Systems

  • Importance of Electrical Wiring for Air Conditioning Systems,
  • How to get the Electrical Wiring for Air Conditioning systems?,
  • Types of Electrical Wiring Diagrams For Air Conditioning Systems,
  • How to read Electrical Wiring Diagrams?


Today, I will explain Electrical Wiring for different Air-Conditioning Systems Types and Equipment.


Third: Electrical Wiring Diagrams for Air-Conditioning Systems - Continued


The Electrical wiring diagrams for Typical Air conditioning equipment

The main types and equipments in common Air conditioning systems were:

  • Window air conditioning units,
  • Split air conditioning units,
  • Multi-Split air conditioning units,
  • Mini-heat pumps,
  • Split Packaged units,
  • Unitary Packaged units,
  • Chillers,
  • Air Handling Units,
  • Fan Coil Units,
  • Pumps,
  • VAV boxes,
  • Dampers.


1- Window Air Conditioning Units


1.1 Window Air Conditioning Units Construction

Window air conditioning unit casing houses the following components: (see Fig.1)


Fig.1: Window Air Conditioning Units Construction

  1. Condenser (outdoor coil),
  2. Condenser fan,
  3. Hermetic compressor,
  4. Evaporator (indoor conditioning coil),
  5. Evaporator fan (blower),
  6. Controls: The controls for window units are simple and inbuilt, it includes: (see Fig.2)

Fig.2: Window Air Conditioning Units Controls


  • A rotating selector/Mode switch marked with a hot-cold scale of five positions (off, high cool, low cool, high fan, low fan) with no temperature settings.
  • A rotating Thermostat switch work as on/off switch for the compressor, its status is depending on what temperature/cooling degree you set it at (usually there are 8  positions for cooling degree).
  • Louvers swing switch: it is on/off switch which controls the swing motor responsible for controlling the movement and direction angle in which the air be supplied from the louvers to the room.


1.2 The power flow in Branch circuit of a Typical Window air conditioning unit

  • The Window air conditioning units are fed from single phase power source (see Fig.3), so its branch circuit and its main power cord consisting of 3 wires (The ground wire, hot wire and neutral wire).

Fig.3: Window Air Conditioning Unit Power Circuit

  • The branch circuit will originate from one of the single pole Overcurrent protective device OCPD included in an electrical panel.
  • Then go through raceway system (conduits, ducts, …) to a disconnect means of some type suitable for the application .
  • Finally, the main power cord of the Window air conditioning unit is connected to this disconnecting means from one side, the other side enters the casing of the unit to be connected to the unit’s terminal box.


1.3 Electrical wiring connections inside The Window air conditioning units

Here we are interested on how the main power cord is connected inside the unit and this can be explained as follow (see Fig.4):


Fig.4: Window Air Conditioning Unit Internal Electrical Wiring


A- Inside the unit the main power cord is split to:
  1. The ground wire (either green or a bare wire) is screwed to the metal casing of the unit.
  2. Hot wire
  3. Neutral wire.


B- Hot wire goes to the selector switch on a window unit to feed power to the vital parts, compressor and fan motor as follows:
  • Hot wire to selector switch to thermostat switch to compressor
  • Hot wire to selector switch to fan motor.


C- Neutral wire will be connected to fan motor and compressor without goes through any switch. These connections are made on the wire connector in the back of the selector switch so, all neutral wires are common to each other because they are connected to the same point.

some examples for the complete electrical wiring diagrams for Window Air Conditioning Unit are inFig.5.


Fig.5: Window Air Conditioning Unit Electrical Wiring Diagrams
Also, in Fig.6, you can find examples for the complete wiring diagrams for Window Air Conditioning Unit which be mounted on the unit casing.

Fig.6: Window Air Conditioning Unit Electrical Wiring Diagrams - Factory built-in


also, you can find examples for the complete wiring diagrams for Window Air Conditioning Unit, touch and remote control type in Fig.7.


Fig.7: Window Air Conditioning Unit Electrical Wiring Diagrams - Touch and Remote Control Type


1.4 The power flow inside a Typical Window air conditioning unit in the cooling mode


  • When you turn the selector switch to cool mode, the power that came in from the cord that connected to the selector via hot wire goes to the fan so the fan operates.

  • The selector switch also sends the power via hot wire to the compressor, but the compressor will not operate until the thermostat comes to the on position, then the compressor will operates and the cooling cycle begin.


2- Split Air Cooling Units


2.1 Split air Cooling Units Construction

The split systems are individual systems in which the two heat exchangers are separated (one outside, one inside) (see Fig.8). There are two main parts of the split air conditioner which are:


Fig.8: Split air Cooling Units Construction


  1. Outdoor unit,
  2. Indoor unit.


1- Outdoor unit:

This unit is installed outside the room or office space which is to be cooled and houses important components of the air conditioner like:
  • The compressor,
  • Condenser Cooling Fan,
  • Expansion Valve.


2- Indoor unit:

The most common type of the indoor unit is the wall mounted type though other types like ceiling mounted and floor mounted are also used. The indoor unit produces the cooling effect inside the room or the office and houses the following components:

  • The evaporator coil or the cooling coil,
  • Cooling Fan or Blower,
  • The drain pipe,
  • Louvers or Fins,
  • Air filter,
  • Controls.


2.2 The power flow in Branch circuit of a Typical split air conditioning unit

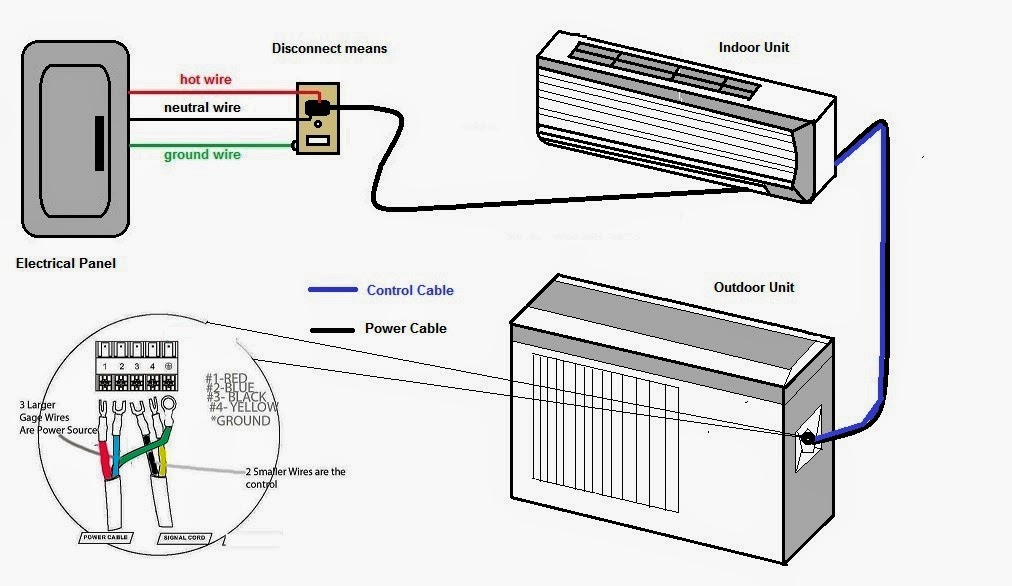
The split air conditioning units are fed from either:

  • Single phase power source (see Fig.9 and Fig.11), so its branch circuit and its main power cord consisting of 3 wires (The ground wire, hot wire and neutral wire).


Or
  • Three phase power source (see Fig.12), so its branch circuit and its main power cord consisting of 5 wires (The ground wire, 3 hot wires and neutral wire).


Fig.9: Split air Cooling Units - Single Phase - Indoor feed Outdoor 

Fig.10: Split air Cooling Units - Single Phase - Electrical Wiring Diagram

Fig.11: Split air Cooling Units - Single Phase - Outdoor feed Indoor


Fig.12: Split air Cooling Units - Three Phase 


Fig.13: Split air Cooling Units - Three Phase - Electrical Wiring Diagram

  • The branch circuit will originate from one of the single pole/three pole Overcurrent protective device OCPD included in an electrical panel.
  • Then go through raceway system (conduits, ducts, …) to a disconnect means of some type suitable for the application.
  • After that, the main power cord of the split air conditioning unit is connected to this disconnecting means from one side, the other side is connected to the terminal box in the indoor unit (see Fig.9) or in the outdoor unit (see Fig.10)according to the manufacturer’s recommendations and wiring diagrams.


Note:

if power source connections made in indoor unit, an indoor disconnecting means is used and if power source connections made in outdoor unit, an outdoor disconnecting means (see Fig.14) with suitable identity of protection (IP) is used (review the manufacturer’s recommendations and wiring diagrams).

Fig.14: Outdoor Disconnecting Means


  • Finally, the power is transferred via 3-wire cable or 5-wire cable from the terminal box in indoor unit to the terminal box in outdoor unit or vice versa as indicated in the above point.


Note:

There is a signal cable also connecting the control in the indoor unit with the control in the outdoor unit.


2.3 Electrical wiring connections inside The Split air conditioning units


The electrical wiring inside both of indoor and outdoor units is more complicated than that of window air conditioning units. It is always factory wiring and from our point of view as electrical power engineers, it will not affect our work at all. However, we provide some examples for the electrical wiring diagrams including control wiring for reference as in below Fig.15.


Fig.15: Split air conditioning units - Internal Electrical wiring Diagram


3- Multi-Split Air Conditioners


3.1 The power wiring for multi-split air conditioners

  • These days, Multi-split air conditioners are also being used commonly (see Fig.16). In units for one outdoor unit there are two indoor units which can be placed in two different rooms or at two different locations inside a large room.
Fig.16: Multi-split air conditioners

  • The power wiring for multi-split air conditioners will be as in Fig.17 below.


 Fig.17: Multi-split air conditioners Power Wiring

in Fig.18, you can find examples for the complete wiring diagrams for Multi-split air conditioners.

Fig.18: Multi-split air conditioners Electrical Wiring Diagram


4- Mini- Heat Pumps


4.1 The power wiring of Mini- Heat Pumps


The power wiring of Mini- Heat Pumps will look like that of the Split air Cooling Units for far extent (seeFig.19). 


Fig.19: Mini-Heat Pumps


However, you can find in below some examples for wiring diagrams for Mini- Heat Pumps (see Fig.20) and you can compare them with that of Split air Cooling Units especially in the power (high voltage) wiring.


Fig.20: Mini-Heat Pumps Electrical Wiring Diagram


5- Split Packaged Units


5.1 Split Packaged Units Construction

A split system describes an air conditioning or heat pump system that is split into two sections (see Fig.21)which are:

  1. Outdoor section,
  2. Indoor section.


Fig.21: 
Split Packaged Units Construction


1- Outdoor section:

The outdoor unit is located outside usually on the ground but sometimes on the roof. It houses the following components:

  • Compressor(s),
  • Condenser coil(s),
  • Condenser fan(s),
  • Condenser's fan motor(s),
  • Fan grille,
  • Shut off valves,
  • Reversing valve,
  • Optional accessories (if any).


2- Indoor section:

The indoor section usually located in an interior closet or garage. It houses the following components:

  • Blower(s),
  • Evaporator coil,
  • Thermal expansion valve(s) and distributor(s),
  • Bearings and shaft,
  • Optional accessories.


5.2 The Electrical wiring in Split Packaged units

The Electrical wiring in Split Packaged units consists of 3 main parts as follows:

  1. High voltage part (power part),
  2. High voltage control and motors part,
  3. Low voltage control part.


1- High voltage part (power part):(see Fig.22)


Fig.22: Electrical wiring of Split Packaged unit - High voltage part


The branch circuit will originate from one of the three pole Overcurrent protective device OCPD included in an electrical panel.

Then go through raceway system (conduits, ducts, …) to :

  • A disconnect means of indoor unit (Air handler unit),
  • A disconnect means of outdoor unit (condenser/evaporator unit).


2- High voltage control and motors part:(see Fig.23)


Fig.23: Electrical wiring of Split Packaged unit - High voltage control and motors part

  • This includes the high voltage wiring inside air handler unit and inside condenser/evaporator unit.
  • Inside the air handler unit, the high voltage wiring powers the indoor fan, the heater and provide power for the transformer.
  • Inside the condenser/evaporator unit, the high voltage wiring powers the outside fan and the compressor.


3- Low voltage control part:

This part has (2) mode for operation which are:
  1. A/C Mode,
  2. Heat Mode.


A- In the A/C Mode:(see Fig.24)


Fig.24: Electrical wiring of Split Packaged unit - Low voltage control part - A/C Mode


The thermostat send signal in (2) directions as follows:
  • Via the Y wire to turn on the outside fan and the compressor,
  • Via the G wire to turn on the indoor fan.


B- In the heat Mode:(see Fig.25)


Fig.25: Electrical wiring of Split Packaged unit - Low voltage control part - heat Mode


Also, the thermostat, in this mode, sends signal in (2) directions as follows:
  • Via the G wire to turn on the indoor fan,
  • Via the W wire to turn on the heater.


So, the complete wiring diagram will be as in Fig.26 below:


Fig.26: Electrical wiring of Split Packaged unit - Complete Circuit


Note:

The thermostat usually have (5) positions which are Off – Cold – Auto – Heat – on.

You can find in below some examples for wiring diagrams for split packaged units with different starting methods in Fig.27.


Fig.27: Electrical wiring of Split Packaged unit with different Starting Methods


6- Unitary Packaged Units


6.1 The power circuit for Unitary packaged units

  • Unitary packaged systems (see Fig.28) are by far the most commonly used air conditioning equipment in commercial buildings. A packaged air conditioning unit is a self-contained air conditioner. It provides the cooling, heating and the motion of the air. All the components needed for cooling, heating, and air movement are assembled in a steel casing.  Most packaged units use semi hermetic compressors which mean that the motor and compressor unit are mounted in one housing.
Fig.28: Rooftop packaged units Construction

  • Unitary Packaged units are packaged units which come as one single package that is ready to be mounted on a rooftop or on ground floor for some types.
  • Rooftop packaged units can be classified according to the type of heating they supply. There are rooftop packed units with either electric heating or gas-fired heating. The heating can also be provided by a heat pump. However, electric heat and gas-fired furnaces are mainly used.
  • The available cooling capacity of common packaged rooftop units ranges from 10 kW (3 tons) to 850 kW (241 tons). The air flow rate covers a range from 400 l/s (850 ft3/min) to 37,800 l/s (80,000 ft3/min).


The power Schematic diagram for Rooftop packaged units is shown in Fig.29.


Fig.29: Power Schematic diagram for Rooftop packaged units